Keyboard Shortcut to Quickly View the Desktop
With Windows 7 you can peek at the desktop without having to mouseover the glossy rectangle in the lower right corner. To do this you press the Windows key + spacebar, when you release the keys the application that was on your screen will come back up. To view your desktop you can press the Windows key + D.
Display Control Panel from Start Menu
Windows 7 allows you direct access to individual Control Panel items directly from the Start menu. To configure this, right-click the Start button in the taskbar and click Properties. In the Taskbar and Start Menu Properties window click the Start Menu tab, then the Customize button. Under the subcategory named Control Panel on the screen choose ‘Display as a menu’. Once you have finished doing this you will then be able to click ‘Control Panel’ in the start menu and see a sub-menu with all the Control Panel options.
Arrange Taskbar Icons
You can easily arrange icons on the taskbar by dragging to where you want it. You can also add icons to the taskbar by dragging them from an application, and delete the icons by highlighting them and pressing the Delete key.
Use a Keyboard Shortcut to View Taskbar Thumbnails
If you like to use keyboard shortcuts you can press the Windows key + T to view thumbnails in the taskbar. The first press will put focus on the left most icon and move one to the right with each additional press.
 Launch Applications from the Taskbar with Keyboard Shortcuts
You can launch any program on the taskbar without a mouse. Simply press the Windows key and the number that corresponds to the position of the application on the taskbar. For example, Windows key + 1 to launch the left most application on the taskbar, Windows key + 2 key to launch the second left-most application and so on.
Run Multiple Instances of an Application from the Taskbar
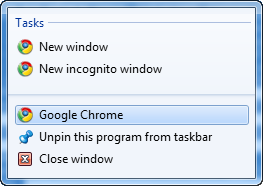
If you want to launch a second instance of a program that is already running all you have to do is hold down the Shift Key and click the icon. A second way to accomplish this is to right click the running program icon on the taskbar and then click the program name.
Burn ISO images
With Windows 7 you can burn ISO images to CDs or DVDs. It is very easy to use, all you have to do is double click the ISO image, choose the drive with the blank disc, click Burn and wait for your disc to be created.
Open a Command Prompt at any Folder
If you access the command prompt a lot then you will love this tip. With Windows 7 you can open the command prompt from any folder when browsing in Windows Explorer. All you have to do is hold down the Shift key, right click on the folder, and click ‘Open Command Prompt Here’.
Make Thumbnails Display Faster on the Taskbar
A benefit of Windows 7 is the ability to see thumbnails of all your open applications when you mouse over the icons in the taskbar. When you do this you may notice a delay before the thumbnail appears. You can speed this up by editing the registry.
1. Enter ‘regedit’ in the Start menu and click ‘regedit.exe’.
2. Go to HKEY_CURRENT_USERControlPanelMouse
3. Double click MouseHoverTime. The default value is 400 (milliseconds) change this by entering a lower value such as 100 or 200. Click OK and exit the registry editor. For this change to take affect you will need to reboot your computer.
2. Go to HKEY_CURRENT_USERControlPanelMouse
3. Double click MouseHoverTime. The default value is 400 (milliseconds) change this by entering a lower value such as 100 or 200. Click OK and exit the registry editor. For this change to take affect you will need to reboot your computer.
Restrict What Applications a User can run
Windows 7 has a feature called AppLocker that that will make sure users can only run applications you specify. Configure AppLocker by typing GPEDIT.MSC in the Start menu search box and going to Computer Configuration > Windows Settings > Security Settings > Application Control Policies > AppLocker. Here you will be able to setup application policies you want your users to follow.
 Tweak Your PC volume
By default Windows 7 automatically reduces your PC’s volume if it detects that you are making or receiving a phone call on your PC. To change this all you have to do is right click the speaker icon on your taskbar, select Sounds > Communications, and tell Windows what you’d like it to do. You can mute all other sounds, reduce the volume by 80%, reduce the volume by 50%, or do nothing.
Get More Screen Space
The Windows 7 taskbar can take up a quite a bit of screen real estate. You can use small icons by right clicking the Start button, clicking Properties, make sure you are on the Taskbar tab and select Use small icons then click OK.
Automatically Arrange the Icons on Your Desktop
If your Windows 7 desktop has scattered everywhere then all you need to do is right click the desktop and select View > Auto arrange. You can also press the F5 key while on the desktop to achieve the same result.
Problem Steps Recorder
In Windows 7 when an application starts having problems all the user needs to do is use the Problem Steps Recorder to record what they were doing so that you can have all the details. To do this have them click Start, type PSR and press Enter, then click Start Record. They can then work through what they were doing and have the Problem Steps Recorder record every click and keypress, take screenshots, and zip everything up into a single file that can be emailed to you. This tip will save you a great deal of time if you help others with computer problems.
Disable smart window arrangement
If you do not like the auto window arrangement in Windows 7 you can disable it by making a registry edit. Run REGEDIT, go to HKEY_CURRENT_USERControl PanelDesktop, set WindowArrangementActive to 0, reboot, and your windows will behave just as they always did.
1. Enter ‘regedit’ in the Start menu and click ‘regedit.exe’.
2. Go to HKEY_CURRENT_USERControl PanelDesktop
3. Set WindowArrangementActive to 0, click okay and exit the registry editor. You will need to reboot in order for the changes to take effect.
2. Go to HKEY_CURRENT_USERControl PanelDesktop
3. Set WindowArrangementActive to 0, click okay and exit the registry editor. You will need to reboot in order for the changes to take effect.
Enable virtual Wi-Fi
There is a little known feature in Windows 7 called Virtual Wi-Fi, which turns your PC or laptop into a software based router. Other Wi-Fi-enabled devices within range will detect you as a new network and be able to share your internet connection once you are logged on.
First you will need to check with you wireless adapter manufacturer and to ensure this is supported by your device. Once you have verified this make sure you have installed the latest driver for you device.
Now that your wireless adapter is good to go you will need to get a tool to configure Virtual Wi-Fi. That is an application called Virtual Router that is easy to use and best of all free. It will have you sharing your internet connection in no time.
Now that your wireless adapter is good to go you will need to get a tool to configure Virtual Wi-Fi. That is an application called Virtual Router that is easy to use and best of all free. It will have you sharing your internet connection in no time.
 Use Sticky Notes
The Windows 7 Sticky Notes app is far more useful then it was in Vista. Simply type StikyNot.exe in the Start menu search box and a sticky note will popup. You can enter a note, right click and change the color of the note, click the plus sign to add a new note or the X to delete the note. To save the note, click on it and press Alt + 4, though notes are automatically saved.
Customize System Restore
Windows 7 allows you to configure the system restore option with a few useful options. Click the Start button, right click Computer and select Properties > System Protection > Configure. This is where you can set the Max Usage value to a size that fits your requirements, remember make this larger to hold more restore points and smaller if you want to save disk space.
If you don’t need System Restore to save Windows settings you can select the “Only restore previous versions of files” option. With this option Windows 7 will not back up your registry, which will allow you to get more restore points and file backups into the available disk space. If you use this option System Restore may not be able to get an unbootable PC working again so use this with caution.
Defrag Multiple Drives at a Time
The Windows 7 defrag utility has some interesting features in the command line version.
/c – Perform the function on all volumes
/r – Defrag multiple drives in parallel
/h – Defrag at a higher than normal priority
/u – Provide progress reports so you can see exactly what’s going on.
To use these switches type ‘CMD’ into the Start menu search box and type:
defrag /c /h /u /r
Enter defrag /? to view all the options.
Minimize All Applications not in Use
Sometimes you want to minimize all the applications except for the one you are working in. Fortunately this can be easily accomplished with Windows 7. Windows 7 has a feature called Aero Shake, simply click and hold the title bar of the application you want to keep maximized and shake your mouse back and forth, all other applications should now be minimized. You can also do this by pressing the Windows key + Home.
We hope you enjoyed these tips and tricks and that you also learned a thing or two about Windows 7. As we mentioned earlier Windows 7 is full of enhanced features so please feel free to share with us your favorite ones in the comments section.
